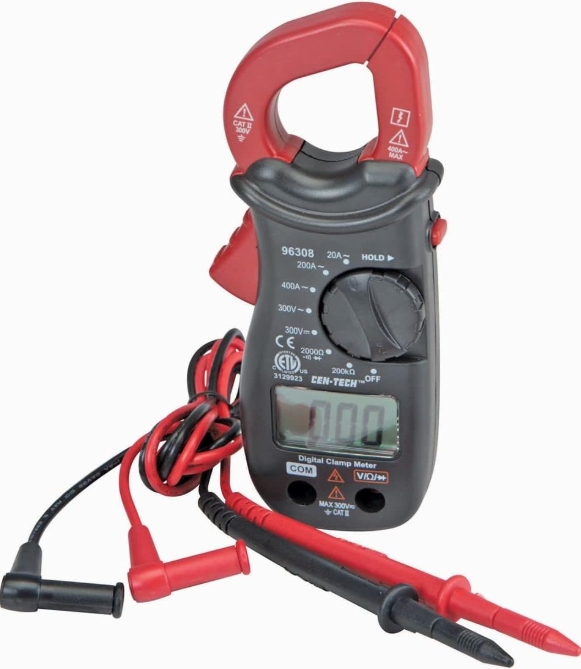
96308 6-Function Digital Clamp Meter
- 6 Functions
- Features easy to read 3-1/2 digit LCD display
- Data keep retains information after test – Automatic zero adjust
- Comes with (2) 36-inch test leads, (3) 3V lithium batteries
- AC Voltage up to 300V, DC Voltage up to 300V, AC Current 20-400A
$39.99
Let me start with a confession: for years, I was that person who called an electrician for every minor electrical issue at home. The thought of dealing with anything involving circuits or voltage made my palms sweat. Then came the fateful Saturday when my garage door opener stopped working, the electrician couldn’t come for three days, and I had a car trapped inside. That’s when my neighbor Pete introduced me to what would become my favorite tool: the Cen Tech digital meter.
A good digital meter doesn’t just solve problems—it prevents them from happening in the first place. This simple truth changed my relationship with home maintenance forever, and I’m betting it could do the same for you.
What Exactly Is a Cen Tech Digital Meter?
Before Pete handed me his trusty Cen Tech, I honestly thought all those electrical measuring devices were basically the same thing. I couldn’t have been more wrong.
A Cen Tech digital meter (technically a digital multimeter or DMM) is a portable electronic measuring instrument that combines several measurement functions into one convenient device. Made by Harbor Freight’s house brand, these meters have gained a reputation as reliable, affordable alternatives to the more expensive professional-grade meters.
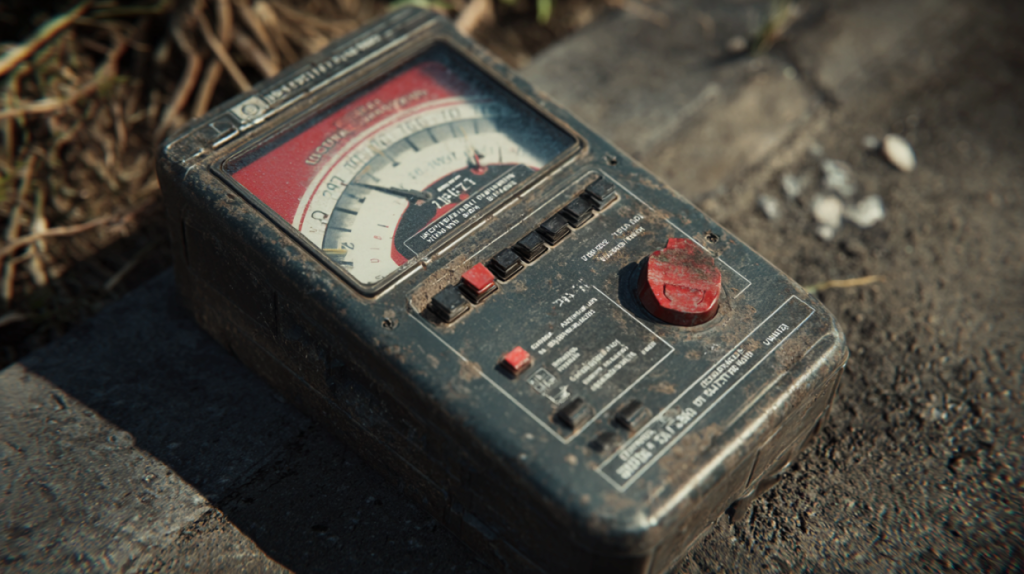
The first time I held one, I was surprised by how lightweight yet sturdy it felt. The yellow casing isn’t just for looks—it’s actually a protective rubber holster that guards against accidental drops. Trust me, this feature alone has saved my meter at least a dozen times when working in awkward spaces.
While professional electricians might opt for more expensive brands like Fluke or Klein, the Cen Tech models offer impressive capabilities for a fraction of the price. For weekend warriors and DIYers like myself, they hit the sweet spot between functionality and affordability.
The Magic Behind the Measurements: How It Works
I’m no electrical engineer, but Pete explained the basics in a way that finally made sense to me.
At its core, a digital meter works by sensing electrical properties and converting them into readable numbers on a digital display. The internal circuitry includes precision resistors, capacitors, and an analog-to-digital converter that transforms the electrical signals into the numbers you see on screen.
What makes digital meters like the Cen Tech models so useful is their ability to measure multiple electrical properties by simply turning a dial. No need for multiple specialized tools—this single device can handle various testing scenarios.
The meter uses different internal circuits depending on what you’re measuring. When checking voltage, it works as a high-impedance device, drawing minimal current from the circuit being tested. For resistance measurements, it sends a tiny known current through the component and measures the resulting voltage drop. For current measurements, it becomes part of the circuit, allowing electricity to flow through it for measurement.
What Can You Actually Measure With It?
When Pete first showed me all the functions on his Cen Tech meter, I was overwhelmed. The selector dial had more symbols than I knew what to do with. Now, after using one regularly for the past couple of years, I’m amazed at how versatile this tool really is.
Here’s what you can measure with a standard Cen Tech digital meter:
- AC Voltage: Perfect for checking wall outlets, appliance power supplies, or any alternating current source. I’ve used this function to verify that my outlets are delivering the proper 120V and to troubleshoot a mysteriously dead section of Christmas lights.
- DC Voltage: Essential for testing batteries, car electrical systems, and DC electronics. I now test all my batteries before tossing them, saving me hundreds of dollars on unnecessary replacements.
- Resistance: Measured in ohms, this function helps check continuity in wires, test fuses, and verify that components like heating elements are working. I used this to figure out why my electric dryer wasn’t heating properly—turned out to be a simple heating element issue I fixed myself.
- Continuity: Many Cen Tech models include an audible continuity tester that beeps when a complete circuit is detected. This has been invaluable for tracing wires in my walls without having to cut into the drywall.
- Current (Amperage): By measuring how much electricity is flowing through a circuit, you can diagnose power-hungry devices or detect problems. I recently used this feature to confirm that my refrigerator was drawing the correct amount of power after it started making strange noises.
- Transistor and Diode Testing: Some models allow you to test semiconductor components, which I honestly haven’t needed much but could be valuable for electronics hobbyists.
The more advanced Cen Tech models even include capacitance measurement, frequency testing, and temperature sensing capabilities. While I haven’t needed these specialized functions often, it’s nice knowing they’re available if a project requires them.
Getting Started: How to Use Your Cen Tech Digital Meter
The first time I tried using Pete’s meter, I was terrified I’d break something—either the meter itself or worse, whatever I was testing. But the learning curve is actually much gentler than I expected.
The Basics:
- Safety First: Always start with the meter off and the probes disconnected. Inspect the meter and test leads for any damage before use. The rubber coating on the leads should be intact with no exposed metal except at the tips.
- Battery Check: When you first power on the meter, make sure the display lights up clearly. If the display is dim or shows a battery indicator, it’s time for a replacement. A weak battery can cause inaccurate readings.
- Select Your Function: Turn the dial to the appropriate measurement type. For voltage testing, choose either AC (usually marked with a V~) or DC (marked with a V⎓). If you’re unsure about the expected range, start with the highest setting and work your way down.
- Connect the Leads: The black lead always goes into the COM (common) port. The red lead typically goes into the VΩmA port for most measurements, though for high current testing, you’ll use a dedicated high-current port.
- Take Your Reading: Touch the probe tips to the correct test points in your circuit. For voltage, place the leads in parallel with the component. For current, the meter must be in series with the circuit. For resistance, the component should be disconnected from power.
My First Success Story:
The first time I successfully diagnosed a problem was when my son’s RC car stopped working. Using the Cen Tech meter, I tested the battery pack (fine), then checked continuity through the power switch (broken). A $2 switch replacement later, and I was officially the family hero.
What surprised me most was how the meter instantly became a detective’s tool in my hands. Each measurement narrowed down the possible culprits until the problem had nowhere to hide. There’s something deeply satisfying about methodically eliminating possibilities until you uncover the truth.
The Impressive Features of Cen Tech Digital Meters
As I’ve explored the different Cen Tech models available, I’ve grown to appreciate certain features that set them apart from other budget multimeters.
Display Quality
Even the basic models feature clear, easy-to-read LCD displays. The numbers are large enough to read from a distance, which matters when you’re contorting yourself to reach behind appliances or under dashboards. Some models include backlighting, which has saved me countless times when working in dim spaces like my crawlspace.
Auto-Ranging Capability
While not all Cen Tech meters have this feature, the ones that do are worth the small additional cost. Auto-ranging means the meter automatically selects the appropriate measurement range, eliminating guesswork and preventing potential damage from incorrect settings. When I’m working quickly on multiple tasks, this feature alone prevents many frustrating errors.
Data Hold Function
This simple but crucial feature allows you to “freeze” a reading on the display—perfect for when you’re testing something in a hard-to-reach area where you can’t see the display and the test points simultaneously. I use this constantly when working on my car, where I often need to stretch to reach test points under the hood.
Protective Features
Most Cen Tech meters include built-in fuses and overload protection. While I hope never to test these features to their limits, it’s reassuring to know they’re there, especially when working with unknown voltages. The rubber holster provides drop protection, and some models even include test lead storage to prevent damage when not in use.
Battery Life
I’ve been pleasantly surprised by how long the batteries last in these meters. My current model has been running on the same 9V battery for nearly a year of regular weekend use. The auto-power-off feature helps conserve battery life by shutting down the meter after a period of inactivity.
Cen Tech vs. Other Digital Multimeters: What’s the Difference?
When I first mentioned buying my own Cen Tech meter, a few of my more tool-savvy friends questioned why I wasn’t going for a Fluke or Klein meter instead. Here’s what I’ve learned about how Cen Tech compares to other options:
Price Point
The most obvious difference is cost. While professional-grade meters can easily run $100-300, Cen Tech models typically range from $20-60 depending on features. For occasional home use, the value proposition of Cen Tech is hard to beat.
Accuracy Considerations
Professional meters often boast higher accuracy ratings—sometimes as precise as ±0.1% for DC voltage. Cen Tech meters typically offer ±0.5% to ±1% accuracy. For home diagnostics and DIY work, this difference rarely matters. I’ve compared readings between my Cen Tech and a friend’s expensive Fluke meter, and for household voltages, the differences were negligible.
Durability and Build Quality
This is where you’ll notice the biggest difference. Professional meters are built to withstand daily use in harsh environments. While my Cen Tech has proven surprisingly durable, it doesn’t have the same “tank-like” construction of top-tier brands. The buttons and selector switch feel less precise, and the ports aren’t as robust.
Specialized Functions
High-end meters often include specialized functions like temperature probes, true RMS measurement for complex AC waveforms, and higher voltage/current ratings. For industrial applications, these features may be essential. For fixing my lawnmower or testing if a battery is good, the Cen Tech covers everything I need.
Safety Ratings
This is an important consideration. Professional meters carry higher CAT safety ratings, making them appropriate for industrial applications and work on high-energy circuits. Cen Tech meters typically have lower CAT ratings, which are still suitable for residential electronics and automotive work but not for industrial power systems.
Testing Voltage: The Most Common Use
Of all the functions available on my Cen Tech meter, voltage testing is what I use most frequently. Here’s my step-by-step process for checking voltage safely:
AC Voltage Testing (Wall Outlets, Home Wiring):
- Set the meter to AC voltage (V~), choosing a range higher than what you expect to measure (in the US, household outlets should be around 120V).
- Insert the black probe into the COM port and the red probe into the VΩmA port.
- For testing a standard outlet, insert the black probe into the larger slot (neutral) and the red probe into the smaller slot (hot). You should read approximately 120V.
- To check for proper grounding, leave the black probe in the neutral slot and move the red probe to the round ground hole. Again, you should see around 120V if the ground is working correctly.
My first successful home repair using voltage testing was diagnosing why a section of outlets in my home office had stopped working. The circuit breaker hadn’t tripped, but the voltage test showed zero volts at the outlets. Further testing at the junction box revealed a loose wire connection that I was able to secure properly, restoring power.
DC Voltage Testing (Batteries, Automotive):
- Set the meter to DC voltage (V⎓), selecting an appropriate range (20V for a 12V car battery, for example).
- Connect the black probe to COM and the red probe to VΩmA.
- Touch the black probe to the negative terminal and the red probe to the positive terminal.
- For a healthy car battery, you should see approximately 12.6V when the engine is off and 13.7-14.7V when the engine is running.
I now routinely check my car battery before winter sets in. Last year, this simple test revealed that my battery was only showing 11.9V at rest—a sign it was beginning to fail. Replacing it before it left me stranded in cold weather was definitely worth the five minutes it took to test.
Measuring Current and Resistance: Beyond the Basics
Once I mastered voltage testing, I gradually became comfortable with the other main functions of my Cen Tech meter.
Resistance Testing:
- IMPORTANT: Always ensure the circuit is powered off before testing resistance. Testing resistance on a live circuit can damage your meter and potentially cause injury.
- Set the dial to the resistance function (Ω).
- Connect the black probe to COM and the red probe to VΩmA.
- Touch the probes to opposite ends of the component you’re testing.
- Read the display for the resistance value in ohms.
I used resistance testing to check if the heating element in my toaster oven was still good. The reading matched the manufacturer’s specifications, confirming that the problem was in the control board rather than the heating element itself.
Current Testing:
Current measurement requires a different approach because the meter must become part of the circuit being tested.
- Set the dial to the appropriate current setting (A for amperes). For small electronics, you’ll likely use the mA (milliamp) setting.
- The black probe goes in COM, but the red probe must go in a special high-current port (often labeled 10A or similar).
- Break the circuit at the point where you want to measure current, and connect the meter in series so that current flows through the meter.
- Read the display for the current value.
Current testing helped me diagnose why my car’s taillight was draining the battery. By measuring the current draw with everything turned off, I discovered an abnormal drain that eventually led me to a faulty trunk light switch that wasn’t fully closing.
Troubleshooting When Your Cen Tech Meter Seems Off
Even reliable tools occasionally act up. Over time, I’ve encountered a few issues with my Cen Tech meter and learned how to address them:
When the Display Shows Nothing:
- Check if the battery needs replacement. This is the most common cause of display failure.
- Ensure the function selector isn’t between settings. Turn it firmly to a specific position.
- Examine the fuse (if accessible). Some measurements like current testing rely on internal fuses that can blow if overloaded.
When Readings Seem Incorrect:
- Verify you’re using the correct function and range for what you’re measuring.
- Check that the probes are fully inserted into the correct ports.
- Inspect the test leads for damage or breaks in the insulation.
- For resistance measurements, ensure the component is disconnected from power.
- For current measurements, confirm the meter is correctly placed in series with the circuit.
When the Meter Shows “OL”:
This typically means “overload”—the value you’re measuring exceeds the selected range. Try switching to a higher range. If you see this when measuring resistance, it often indicates an open circuit (infinite resistance).
One memorable troubleshooting experience happened when my meter suddenly started showing wildly fluctuating readings. After checking the obvious (battery, connections), I discovered the problem was a tiny strand of wire creating an intermittent short between the probe tips inside my tool bag. A lesson in proper tool storage!
Accuracy: Can You Trust Your Cen Tech Readings?
This question kept me up at night when I first started using my meter for more critical applications. Here’s what I’ve learned about Cen Tech accuracy:
For most DIY applications, Cen Tech meters provide more than adequate accuracy. The typical specifications show ±0.8% accuracy for DC voltage and ±1.2% for AC voltage. In practical terms, when measuring a 120V outlet, the reading might be off by about 1.4V either way—not enough to affect diagnostic decisions for home repairs.
I’ve performed side-by-side comparisons with more expensive meters on several occasions:
- Testing a 9V battery: Cen Tech showed 9.42V, professional meter showed 9.45V
- Checking a wall outlet: Cen Tech read 118.3V, professional meter read 118.7V
- Measuring resistance on a speaker: Cen Tech showed 8.1Ω, professional meter showed 8.0Ω
These differences are negligible for everyday applications. Where Cen Tech meters may fall short is in specialized applications requiring extreme precision or when measuring complex waveforms that require true RMS measurement capability.
Calibration: Keeping Your Meter Honest
While professional environments require regular calibration of test equipment, for home use, calibration is rarely necessary for a Cen Tech meter. These meters typically maintain their accuracy well within their specified tolerances for years of normal use.
If you suspect your meter’s accuracy has drifted, here’s a simple check you can perform:
- Test a known voltage source, like a fresh alkaline AA battery (should read approximately 1.5V DC)
- Compare with another meter if possible
- Test standard household voltage at different outlets to check consistency
If your meter consistently shows readings far outside the expected values, it may be more cost-effective to replace it rather than attempt calibration, given the affordable price point of these meters.
My Cen Tech has maintained consistent readings for over two years now, giving me confidence in its continued reliability.
The Price Factor: What You Get at Different Price Points
One of the most appealing aspects of Cen Tech meters is their affordability. Here’s what you can expect at different price ranges:
Basic Models ($10-25):
These entry-level meters typically offer essential functions like voltage, resistance, and continuity testing. They usually have manual ranging (you select the measurement range) and basic build quality. Perfect for occasional home use and simple diagnostics.
Mid-Range Models ($25-40):
At this price point, you’ll find auto-ranging capability, better display quality (possibly with backlighting), data hold function, and additional measurement capabilities like capacitance or transistor testing. These meters strike an excellent balance for serious DIYers.
Premium Cen Tech Models ($40-60):
The top-end Cen Tech meters include features like true RMS measurement for more accurate AC readings, higher safety ratings, temperature probes, and enhanced durability. These are suitable for advanced hobbyists, automotive work, and even some professional applications.
My personal sweet spot was around $35 for an auto-ranging model with backlight and data hold functions. These features have proven most valuable for my mix of home repair, automotive, and occasional electronics projects.
Where to Buy Your Cen Tech Digital Meter
Cen Tech is Harbor Freight’s house brand, so their stores are the primary retailer for these meters. However, you can also find them:
- In Harbor Freight’s physical stores nationwide
- On Harbor Freight’s website
- Through various online marketplaces
- Occasionally at discount tool retailers
I purchased mine during one of Harbor Freight’s frequent sales, saving about 25% off the regular price. They often offer coupons and promotions, so timing your purchase can result in significant savings.
When buying in person, ask to test the meter before leaving the store. Most Harbor Freight locations will allow you to install the included battery and verify that the display works properly.
Battery Replacement: Keeping Your Meter Powered
Eventually, even the most energy-efficient meter will need a new battery. Here’s my process for replacing the battery in a Cen Tech digital meter:
- Turn off the meter completely and disconnect any test leads.
- Locate the battery compartment, typically on the back of the meter. It’s usually secured with one or two small screws.
- Remove the screw(s) and carefully open the compartment.
- Note the orientation of the old battery before removing it.
- Insert the new battery (typically a 9V) in the same orientation.
- Close the compartment and replace the screw(s).
- Turn on the meter to verify proper operation.
I’ve found that quality alkaline batteries provide the best combination of life and reliability, though some users prefer lithium batteries for their longer shelf life. Either way, keeping a spare battery in your tool kit is good practice to avoid being caught with a dead meter in the middle of a project.
Home Circuits: Using Your Cen Tech Meter Safely
One of the most practical applications for a digital meter is troubleshooting household electrical issues. However, working with home wiring requires extra care:
Safety Precautions:
- Always assume circuits are live until you’ve verified otherwise with your meter.
- When possible, turn off power at the circuit breaker before working on fixtures or outlets.
- Use one hand when taking measurements on live circuits to reduce the risk of current passing across your heart if you contact a live wire.
- Wear insulated footwear and avoid standing on wet surfaces.
- Respect the limitations of your meter’s CAT rating (typically CAT II for basic Cen Tech models).
Common Household Tests:
- Testing Outlets: Check for proper voltage (120V in the US) and verify that outlets are wired correctly by testing between hot, neutral, and ground connections.
- Finding Breakers: Use the continuity function to identify which breaker controls a specific outlet or fixture.
- Checking GFCI Protection: Test that GFCI outlets trip appropriately when the test button is pressed, and verify reset functionality.
- Diagnosing Dead Circuits: Systematically trace voltage through a circuit to locate breaks or faults.
My meter helped me identify a mysterious electrical issue in my garage that multiple electricians had missed. By methodically testing voltage at various points, I discovered that an inconspicuous GFCI outlet hidden behind a shelf had tripped, cutting power to several other outlets on the same circuit.
Decoding the Symbols: What Do All Those Markings Mean?
When I first looked at my Cen Tech meter, the dial resembled a cryptic alien language. Over time, I’ve learned to interpret these symbols:
- V~: AC voltage measurement
- V⎓: DC voltage measurement
- Ω: Resistance measurement
- A: Current measurement
- hFE: Transistor gain measurement
- ♫: Continuity test with audible tone
- ⏦: Diode test
- °C/°F: Temperature measurement (on models with this feature)
- μF: Capacitance measurement
- Hz: Frequency measurement
The display itself may show additional symbols:
- AUTO: Indicates auto-ranging is active
- HOLD: Data hold function is engaged
- ▲: Over-range indication
- Battery icon: Low battery warning
- AC/DC: Indicates which type of measurement is active
- m, k, M: Metric prefixes (milli, kilo, mega)
Understanding these symbols transforms the meter from a confusing device into an intuitive tool that communicates clearly what it’s measuring and how.
Automotive Applications: Your Car’s Best Diagnostic Friend
One area where my Cen Tech meter has truly paid for itself many times over is in automotive diagnostics. Modern vehicles are essentially computers on wheels, and many issues can be diagnosed with a good multimeter:
Battery and Charging System Tests:
- Test battery voltage (12.6V when fully charged at rest)
- Check charging system output (13.7-14.7V with engine running)
- Perform voltage drop tests on battery cables to identify poor connections
Sensor Diagnostics:
- Test oxygen sensor voltage outputs
- Check MAP/MAF sensor signals
- Verify temperature sensor resistance values
Circuit Troubleshooting:
- Find parasitic drains that kill batteries overnight
- Test continuity in wiring harnesses
- Verify proper ground connections
Component Testing:
- Check fuses without removing them
- Test fuel injector resistance
- Verify alternator diode function
Last summer, my car wouldn’t start consistently. The battery was new, so I suspected another issue. Using my Cen Tech meter, I performed a voltage drop test that revealed excessive resistance in the ground cable connection. A simple cleaning of the terminal and connection point solved the problem completely—saving me a tow and mechanic’s diagnostic fee.
Reading the Display: Making Sense of the Numbers
Interpreting the readings on your meter is crucial to making the right diagnostic decisions. Here are some tips I’ve learned:
Understanding Units:
The display will show a number along with a unit of measurement:
- Volts (V) for voltage
- Ohms (Ω) for resistance
- Amperes (A) for current
- Farads (F) for capacitance (usually shown as μF or microfarads)
- Hertz (Hz) for frequency
Prefix Multipliers:
Pay attention to the metric prefixes that indicate scale:
- m = milli (1/1000th) – e.g., mV is millivolts
- k = kilo (1000) – e.g., kΩ is kilohms
- M = mega (1,000,000) – e.g., MΩ is megohms
Negative Values:
A minus sign indicates polarity, typically seen when test leads are reversed during DC voltage testing.
Special Indicators:
- “OL” or “1” (leftmost digit only): Overload or out of range
- Flashing numbers: Unstable reading or rapidly changing value
- “bAtt” or battery icon: Low battery warning
Learning to quickly interpret these readings has helped me make faster diagnostic decisions. When troubleshooting my home theater system that had lost sound, seeing a resistance reading of “OL” on the speaker wire immediately told me there was a break in the wire, saving me hours of checking other components.
The Verdict: What Users Say About Cen Tech Digital Meters
I’m not alone in my appreciation for these affordable meters. After joining several DIY and electronics forums, I’ve gathered perspectives from many other users:
Positive Feedback:
- Value for money: The most commonly cited benefit, with users appreciating the functionality at such an affordable price point.
- Durability: Many users report years of reliable service despite occasional drops and rough handling.
- Ease of use: The straightforward interface makes it accessible for beginners.
- Adequate accuracy: For non-professional applications, the accuracy is consistently reported as sufficient.
Common Criticisms:
- Build quality: Some users note that the selector switch feels less precise than on premium meters.
- Lead quality: The included test leads receive mixed reviews, with some users upgrading to better-quality leads.
- Limited warranty: Harbor Freight’s warranty period is shorter than some competitors.
- CAT safety rating: Lower safety ratings make them unsuitable for industrial or high-energy applications.
One review that resonated with me came from a retired electrician who said: “I owned a $300 Fluke for my professional work, but for home use, my $30 Cen Tech does 95% of what I need at 10% of the cost.”
Perfect for Beginners: Starting Your DIY Journey
If you’re new to electrical work or DIY repairs like I was, the Cen Tech digital meter offers an ideal entry point. Here’s why it’s particularly well-suited for beginners:
Gentle Learning Curve:
The basic functions (voltage, resistance, continuity) are straightforward to use and understand. You can start with simple tasks like testing batteries or checking if a fuse is blown, then gradually progress to more complex diagnostics.
Low Financial Risk:
The affordable price point means you’re not making a major investment before knowing if electrical diagnostics is something you’ll use regularly.
Adequate Protection:
While not designed for high-energy industrial environments, Cen Tech meters offer sufficient protection features for typical home and automotive applications when used properly.
Clear Display:
The digital readout eliminates the interpretation required for analog meters, making it easier for beginners to get accurate readings.
If you’re hesitant about whether you need a digital meter, consider starting with one of the more basic Cen Tech models. Even these entry-level versions will handle common household tasks like finding a tripped GFCI outlet, testing batteries, or verifying that a wall outlet is working.
My Final Thoughts: Two Years With a Cen Tech Digital Meter
After two years of regular use, my Cen Tech digital meter has become one of my most-reached-for tools. It’s helped me fix electrical issues in two cars, diagnose problems with numerous household appliances, and even test components for my son’s science fair project.
While it lacks the precision engineering and advanced features of professional-grade meters, its capabilities perfectly match the needs of an enthusiastic DIYer like myself. The money saved on repair calls alone has paid for the meter many times over.
Perhaps most importantly, it’s given me the confidence to tackle projects I would have previously avoided. There’s something empowering about understanding the invisible electrical world that powers our modern lives, and the Cen Tech meter has been my window into that world.
Whether you’re a curious beginner or a seasoned home improvement enthusiast, adding a Cen Tech digital meter to your toolkit is one of the smartest investments you can make. It transforms mysterious electrical problems into solvable puzzles and puts the power of diagnosis literally in your hands.
And the next time your garage door opener mysteriously stops working or your car won’t start on a cold morning? Instead of feeling helpless, you’ll reach for your meter with the confident smile of someone who knows exactly how to find the problem.
That transformation from electrical intimidation to confident troubleshooting has been worth far more than the modest price of admission. And I suspect that if you give it a chance, you might just find yourself writing a similarly enthusiastic review one day.